Ver.2.0
User Manual
Using ComTekk DISPATCHER
CONTENTS:
1. Getting Started
ComTekk DISPATCHER is provided on a 15-day trial basis, after which time registration is required to enable the software. This will be sent via email after purchase is made.
Once DISPATCHER has been successfully installed, you may simply double-click the DISPATCHER desktop icon or Click the Windows Start menu, then Programs, choose the ComTekk folder, then DISPATCHER.
While DISPATCHER is loading, the Splash screen will remain visible for about 5 seconds.
There are several ways to exit DISPATCHER.
- Click the "X" button in the upper right corner of the application window.
- Click the large "X" button on the Toolbar.
- Select the "File" menu, then "Exit"
Please note that if you have more than one sound card installed, it may be necessary to change the default sound device, see Section 6.
Continue on to Section 2 below for detailed description of the Menus and Toolbar...
2. The Menu Bar

File Menu:
- Exit - closes ComTekk
View Menu:
Selecting any item from this menu will TOGGLE it ON or OFF.
- Toolbar - show/hide main toolbar
Tools Menu:
- Settings - opens the Settings window
Help Menu:
- Contents - Displays Help Contents
- Website - Directs default browser to ComTekk's Internet home page.
- Register - Allows entry of a user license key to unlock the software.
- About - Shows general info about ComTekk, version, registered user.
3. The Toolbar

All of Toolbar features can be activated by clicking once on the appropriate toolbar button (below). The toolbar may be turned on/off in the Tools menu.
NOTE: Helpful Hints are revealed by stopping the mouse pointer over any of the buttons or fields throughout ComTekk.
Toolbar Buttons:
![]() Open Settings window
Open Settings window
![]() Exit
Exit
4. Console operation
Upon startup in tone-remote mode, DISPATCHER will transmit the function tone sequence corresponding to the default channel selection, which serves to initialize the proper channel on the remote equipment, if connected.

CONSOLE Controls (left pane):
![]() Receive/Busy Indicator - gives a visual indication that receive audio is present on the sound card input. It may be necessary to select the appropriate input audio device and adjust the RX Indicator Threshold in the Audio Settings.
Receive/Busy Indicator - gives a visual indication that receive audio is present on the sound card input. It may be necessary to select the appropriate input audio device and adjust the RX Indicator Threshold in the Audio Settings.
![]() Channel Selection - Click the up/down buttons to change channels, or up/down arrows on the keyboard when this control is active (selected). The 7-segment LED-type display shows the current channel number, and the dot-matrix display to the right shows the channel name. (see also Channel Settings).
Channel Selection - Click the up/down buttons to change channels, or up/down arrows on the keyboard when this control is active (selected). The 7-segment LED-type display shows the current channel number, and the dot-matrix display to the right shows the channel name. (see also Channel Settings).
![]() Tone Channel - This functions the same as the Channel selection, but controls the repeater access tone (CTCSS). When Ch.0 is selected, CTCSS is disabled, indicated by gray label text. (see also Channel Settings).
Tone Channel - This functions the same as the Channel selection, but controls the repeater access tone (CTCSS). When Ch.0 is selected, CTCSS is disabled, indicated by gray label text. (see also Channel Settings).
![]() Mute button - Activating this on/off (toggle) button mutes the receive audio input. The button will turn red as a visual reminder. Receive audio is automatically unmuted after any transmit key is pressed.
Mute button - Activating this on/off (toggle) button mutes the receive audio input. The button will turn red as a visual reminder. Receive audio is automatically unmuted after any transmit key is pressed.
Channel Volume - Located directly above the Mute button, this slider adjusts the receiver volume heard in the speakers or headphones.
XMIT button - This is the Transmit or PTT (push-to-talk) button. Click and hold the left mouse button to transmit. Transmission will stop when the mouse button is released. When the XMIT button is selected (highlighted), the keyboard space bar may be used as a convenient PTT key. Click to select, or use the Tab key to change focus between the various controls.
NOTE: XMIT will not operate if the Busy indicator is lit, unless "Allow TX on Busy" is checked in the settings.
Main Panel (right pane): Click the "Main" tab in the lower-left corner to activate
MON button - Monitor function, typically used to open the squelch to check for a busy/open channel before transmitting on a shared-frequency system.
A, B, C buttons - Custom function keys programmed in Custom Settings. Can be used for any variety of special features available with the radio or tone termination panel under control.
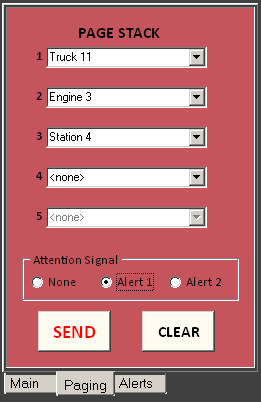
Paging Panel : Click the "Paging" tab in the lower-left corner to activate

Drop-downs (1~5) - Select a unit to be paged out from the #1 drop-down. To page more than one unit, select from #2, #3, etc.
Attention Signal - Selects the alert sound to be transmitted immediately following page-out(s), as defined in the Alert Settings.
SEND - Sequentially transmits selected tone-out(s) #1 - #5, followed by the Attention Signal if selected.
CLEAR - Resets all Drop-downs back to <none>.
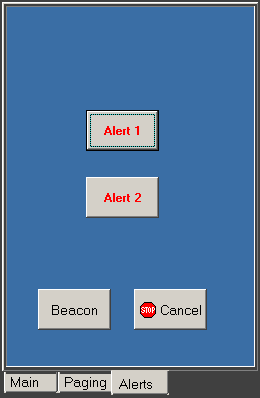
Alerts Panel : Click the "Alerts" tab in the lower-left corner to activate

Alert 1, Alert 2 - Activates the Transmit sequence followed by the Alert signal selected in Custom Settings for the button pressed. XMIT may be pressed immediately afterward to continue transmission for a subsequent voice announcement, as an example.
Beacon button - (on/off) turns the Beacon function on or off (see Custom Settings). Used as a "marker" or status signal to let stations know a special situation exists. Transmits a short beep over the air every few seconds, delay and tone frequency determined in the Custom Settings.
Cancel - Used to cancel an Alert transmission before it has completed. Will also discontinue beaconing if previously activated.
