VeriPage
QUICK START
Ver. 1
This guide will walk you through the important (required) settings to get VeriPage up and running as quickly as possible.
NOTE: Click on red text links for more details on particular items
1. Install and set up VeriPage
1.1 What you will need:
- A suitable computer running Microsoft Windows (see Requirements)
- Radio receiver, tuned to your agency's dispatch frequency (channel).
- Suitable audio cable for connecting receiver's audio/speaker output to the computer sound card input (see section 2 below).
- Speakers should be connected to the computer so you can hear the radio.
1.3 Configure Radio Channels and enter Paging Tones
1.4 Run VeriPage
- Run VeriPage by double-clicking the desktop icon, or run from the Windows Start Menu.
- Follow the steps below to complete installation and configuration.
2. Connect Receiver Audio:
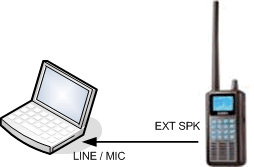
2.1 Preferred method: Using a 1/8" computer audio or iPod cable (either mono or stereo type should work). If you will have more than one radio channel, please see Connecting two or more radios.
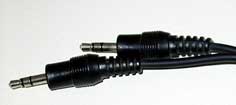
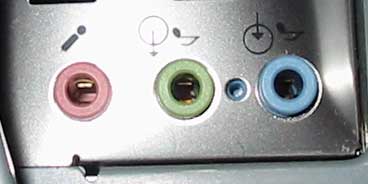
Connect receiver's speaker output to computer sound card's LINE (usually blue) or MIC (usually pink/red). LINE IN is preferred when available. The MIC input is very sensitive and easily overloaded.
2.2 Verify receiver is tuned to the correct frequency, and receiving desired dispatch station clearly (excessive static or interference can cause missed alerts). Radio volume should usually be no higher than about 25%.
2.3 Be sure computer speakers are connected, turned on and volume up part way.
3. Configure VeriPage Audio Settings
3.1 Run VeriPage . Basic settings will be downloaded from the server when logging in. One or more radio channels will appear after login success, so long as they have been provisioned in your online account.
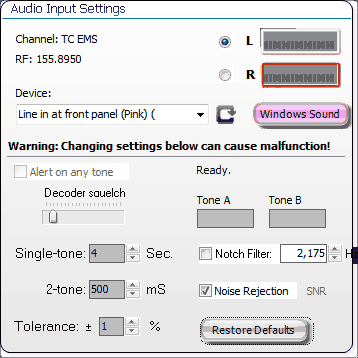
3.2 Click the Setup for the channel you want to configure. Channel name and radio frequency will appear in the upper left.
Fig. 4. VeriPage audio input settings3.3 Select the audio Device from the drop-down list. Then select (L)eft or (R)ight audio channel (either should work if only one radio is connected).
3.4 Be sure the Mute button is OFF during the setup process. Listen for receiver audio through computer speakers - it should be clear and crisp, not too loud or distorted. Watch L/R meters for level well into the blue, peaking in red is ok. Adjust the Windows Sound Recording level control as needed (see step 3.6). It may also be necessary to adjust the receiver's volume control. If level is too high, decoder will not function properly!
3.5 The Squelch control should normally be set to a level in the lower blue range of the VU Meter. The default setting will work fine in most cases.
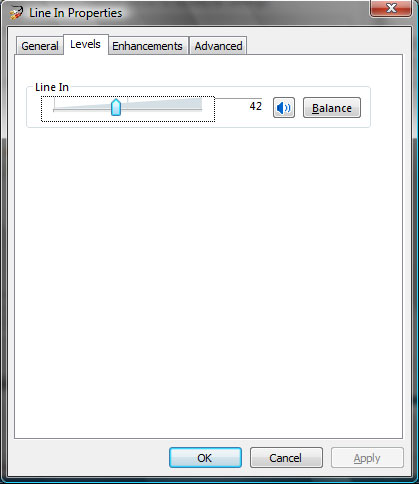
3.6 Click the Windows Sound button to open the Windows recording device dialog (shown below). Disabled devices appear in gray and will not be available to VeriPage until enabled (cable plugged in). Click Properties, then select the Levels tab to adjust the input level of this device as described in step 3.4. To view any hidden devices, right-click the device list area and select Show Disabled/Disconnected Devices.
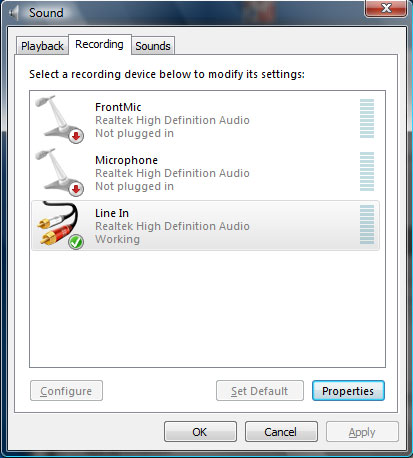
Windows Recording Device selection (left) and Properties (right).3.7 Advanced Audio Input Settings (lower pane Figure 4): DO NOT alter these settings unless directed by Tech Support.
ToneA, ToneB boxes will show the most recent tone(s) decoded.
Squelch - sets decoder threshold. Decoder light will be gray when audio level is below this level.
4. Alert Options
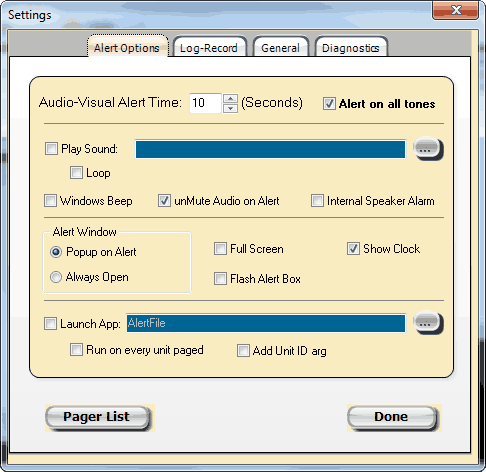
4.1 Audio/Visual alerts: Click on the Alert Options tab. These settings determine what actions will be taken when an alert is detected. Most of these items should be self-explanatory, but some brief descriptions will be provided here. See the Setup section for complete details.
4.1 Audio-Visual Alert Time - determines how long (in minutes) the following audio/visual alerts will repeat. Clicking the RESET button on the main screen will cancel the alert.
4.2 Alert on all tones - Causes VeriPage to provided audio/visual alerts when a tone page is received.
4.3 Play Sound - plays a sound file selected by clicking the
button. The sound file selected should be .WAV type. Check the Loop box for continuous repeat. Windows Beep will repeat the default Windows beep sound through the speakers during the alert time cycle. Internal Speaker Alarm will sound through the computer's internal speaker if equipped.
See Setup Section for more about these settings.
5. Loging / Recording Options
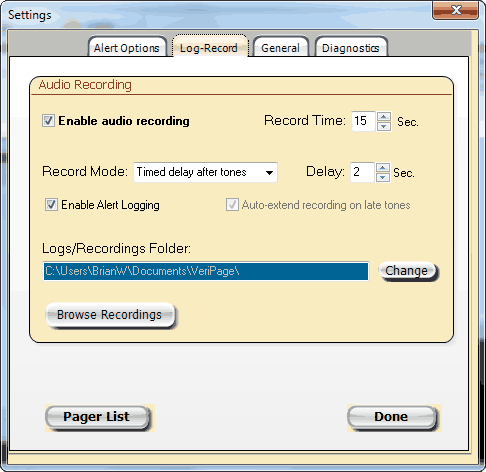
controls event logging and audio recording features. Click the Log-Record tab.
5.1 Enable Alert Logging - Check this box to enable event logging to CSV text file. A dialog will open allowing you to select the log file name, as well as the Logs/Recordings Folder. Log files and recorded audio files will both be stored in this folder. Mouse over to see complete folder name.
5.2 Record Time - The default of 30 seconds is usually long enough to capture critical dispatch information. Keep in mind, longer recordings mean larger files which take more time to send and receive. It's best to keep this time as short as possible.
Auto-extend recording on late tones - enabled by default, this will extend recording time whenever new tones are received while system is still recording the first call.
5.3 Record Mode, Delay- Tow modes of recording are available (default settings are recommended):
- Immediate - Recording will start immediately upon receipt of first tone-out, no delay. One or more tones may be heard in recording.
- Timed Delay After Tones - Recording starts after tones have been sent and after <Delay> seconds.
See Setup Section for more an these settings.
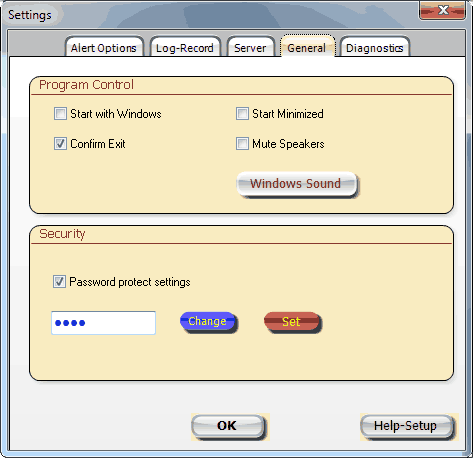
6. General
6.1 Program Control - To launch VeriPage whenever you log in to Windows, check Start with Windows.
See Setup Section for more an these settings.
Congratulations! You should now be ready to start using VeriPage. Testing is highly recommended. This may require asking your dispatcher to transmit one or more test pages to ensure everything is working properly.
Next: Using VeriPage
Disclaimer:
Actual performance may vary between different computers and sound cards. The author makes no warranties or guarantees of performance or suitability for any particular purpose, and assumes no liability whatsoever for the use or misuse of any software products.