EASAlert
![]()
SECTION V. Software Setup
NOTE: Click on red text for more details on highlighted item
CONTENTS
- Install
- Configure EASAlert Audio Settings
- Decoder Settings
- Alert Options
- Mail Setup
- Test Email Settings
- General Options
- Diagnostics
- Email List
- PTT Relay
1. Install EASAlert
If you haven't already, install the software and enter registration key if you already have one. Connect receiver audio to the computer.
2. Configure EASAlert Audio Settings
NOTE: All settings are saved upon exiting EASAlert.
2.1 Run EASAlert. Select Setup -> Preferences from the main menu. Note that all settings are saved upon normal close (exit) of EASAlert.
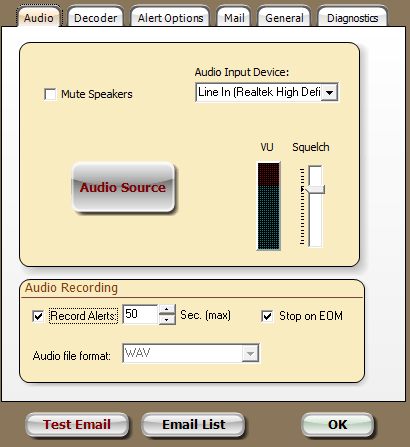
2.2 Click the Audio tab in EASAlert Settings window.
Audio Recording:
Record Alerts - enables automatic recording of selected alerts. Select duration of recording (30-300) Seconds using the up/down buttons.
Stop on EOM - Check this box to automatically stop recording when EOM signal is received. This SAME header is normally sent after the voice announcement is completed. Be sure duration setting is long enough to capture entire message.
Audio file format - As of this version, WAV is the only available format.
2.3 Audio Input Device:
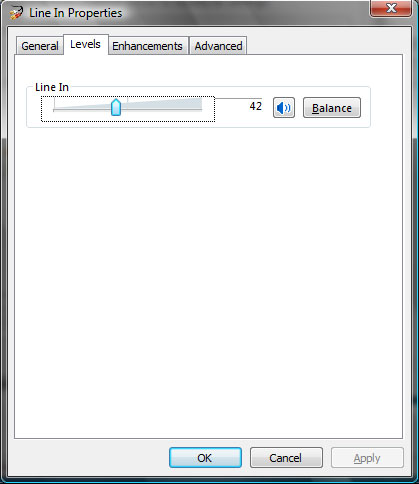
WINDOWS 7 & VISTA: Click the Audio Source button to open the Windows recording device selection dialog. Click once to highlight the desired input device. If more than one device is available, click the Set Default button to make it your default recording device. Click Properties, then select the Levels tab to adjust the input level of this device as described in step 2.4.
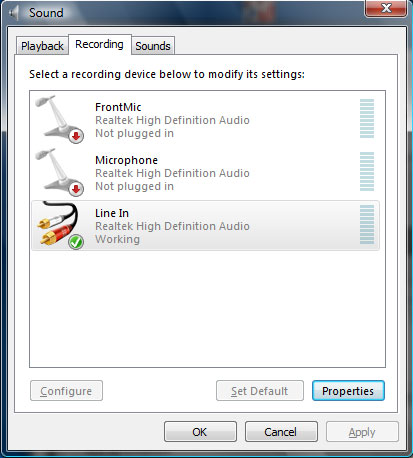
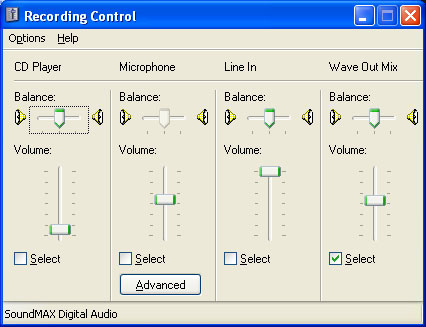
Windows 7 / Vista recording device selection (left) and properties (right).WINDOWS 2000/XP: Select the Audio Device from the drop-down list at right. Then click the Audio Source button to open Windows Recording panel. Select the appropriate input checkbox where your receiver's audio cable is connected. Adjust level up/down as needed to obtain desired VU level (see 2.4 below) .
2.4 Be sure the Mute box is un-checked. Listen for receiver audio through computer speakers - it should be clear and crisp. Watch VU meter for level well into the blue, peaking in red is ok. Adjust the level control below Input Source as needed. It may also be necessary to adjust the receiver's volume control. If level is too high, decoder will not function properly!
2.5 The Squelch control should normally be set to a level in the lower blue range of the VU Meter. The default setting will work fine in most cases.
2.6 The Audio Source button is provided as a convience for accessing the Windows audio control panel if needed.
3. Decoder Settings
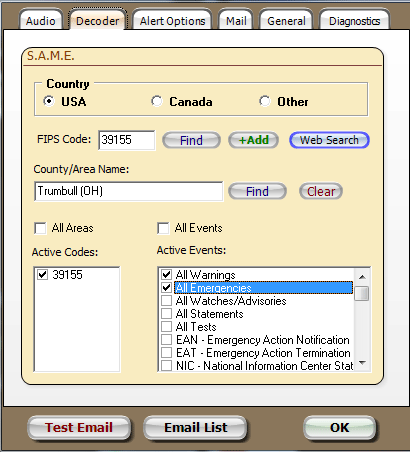
3.1 Country - Select USA or Canada. This will determine whether FIPS or CLC codes are used. Other is reserved for use outside North America -contact Technical Support for more information.
3.2 FIPS Code (or CLC Code) - Use this field to add codes to the Active Codes list. Enter a 5-digit code (if known) for desired notification area. Do not enter the first zero of a 6-digit code - it is not used. To check your code, click the Find button. If found, the area name will be displayed below the code. Click the +Add button to add this code to the Active Codes list.
Look up code by County/Area Name - Type county name or area into the County/Area Name box, then click Find. The Code for the first entry containing search text will be displayed in the Code box. To verify, click the Code Find button. Some county names exist in two or more states. In this case, enter the state abbreviation in parenthesis with a space after the county name as shown above. Click the +Add button to add this code to the Active Codes list. To clear the County/Area Name box, click the Clear button.
If you have difficulty finding a particular code, the Web Search button will launch the US or Canadian code lookup page in your browser.
All Areas - When checked, the Active Codes list will be disabled and the software will alert on any area received, provided the Event code is active.
Active Codes - check or uncheck the box for each listed code. Unchecked codes will be ignored. This feature is convenient for temporary disabling alerts for certain nearby areas.
All Events - When checked, the Active Events list will be disabled and the software will alert on any event received, provided the Area is active.
Active Events - check or uncheck the box for each event. Unchecked event types will be ignored. For convenience, you may select alerts by type, i.e. All Warnings, All Watches/Advisories, All Emergencies, All Statements, All Tests. Any combination of type and/or individual events may be selected as desired.
These settings will be saved when the program is closed normally.
4. Alert Options
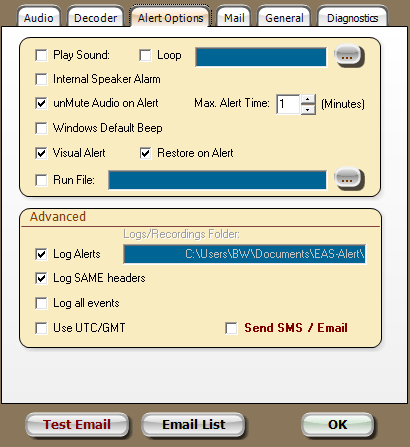
4.1 Audio/Visual alerts: Click on the Alert Options tab. These settings determine what actions will be taken when an alert is detected. Most of these items should be self-explanatory, but brief descriptions will be provided here. See the manual for complete details.
Max. Alert Time - determines how long (in minutes) the folowing audio/visual alerts will repeat. Clicking the RESET button on the main screen will cancel the alert.
Play Sound - plays a sound file selected by clicking the
button. The sound file selected should be .WAV type. Check the Loop box for continuous repeat.
Internal Speaker Alarm - Plays a hi/lo alarm through the computer's internal speaker if so equipped.
unMute Audio on Alert - Causes the receiver audio to play through speakers when an alert is received.
Windows Default Beep - Repeatedly plays the "Default Beep" Windows event sound.
Visual Alert - This will cause the main screen to flash red during an alert. The tray icon will also flash if program is minimized.
Restore on Alert - If minimized, will restore the program window.
Run File - A powerful feature, launches any external program, script or associated file when alert is received. Click the
button to select a file. HINT: Test this action by navigating to the file you want to run using Windows File Explorer or My Computer, then double-click on the file.
4.2 Advanced options -controls event logging and emailing features.
Log Alerts - Check this box to enable event logging to CSV text file. A dialog will open allowing you to select the log file name, as well as the Logs/Recordings Folder. Log files and recorded WAV files will both be stored in this folder. Mouse over to see complete folder name.
Logs/Recordings Folder - To change the location where alert logs and audio recordings are stored, un-check Log Alerts then check it again. This will bring up the open file dialog.
Log SAME headers - This option will include the raw data (SAME header) in the event log. Here is an example of a typical raw header:
ZCZC-WXR-RWT-039155+0600-0990140-KCLE/NWS-
Log all events - When checked, all events will be logged, whether they are active or not. This is helpful for testing and verification purposes.
Use UTC/GMT - Determines whether messages will be presented in local time zone or GMT (Greenwich Mean Time).
Send SMS/Email - Enables automatic sending of text messages when active alerts are decoded.
5. Mail
5.1 Email Settings - To utilize the email feature, you must have an email account. Most ISPs provide at least one email account. Note that SSL/TLS, required by some servers such as Gmail, Yahoo!, Hotmail, etc., is not supported at this time. Auto Configure is provided for some of the most common email services. We recommend using an email account provided by your ISP (Internet Service Provider). Alternatively, if you have no more than 5 or so recipients, a free account at GMX mail should be adequate: http://www.gmx.com
Users with a higher message volume, requiring more reliable email service should consider ComTekk's SMTP mail service.
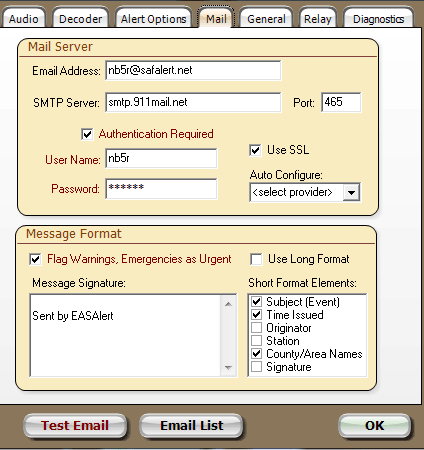
First click the Auto Configure drop-down to see if your provider is listed. Making a selection here will populate the basic settings for that particular provider. A message box will appear, propting you to enter your email address, and account login & password.
NOTE: Be sure SMTP/POP3 access is enabled for your email account! Many ISPs are now blocking port 25 as an anti-spamming measure - in this case, try port 587 as an alternate.
Email Address - enter the complete email address for the account you will be using here.
SMTP Server - This is your OUTGOING mail server address, as provided by your email service. Port 25 is the standard for outgoing email - do not change unless you know the specific port number (see note above).
Authentication Required - Some ISPs don't require a login/password if you are connected to their network. If this box is checked, you must provide the User Name and Password as well.
Flag Warnings, Emergencies as Urgent - Alert emails for Warning or Emergency event types will be marked as "Urgent". Note that not all email programs or services will utilize this flag.
Use Long Format - Decoded messages will be sent as a fully translated, plain text format.
Short Format Elements - Best to use when sending to SMS addresses.
Subject (Event) - If selected, the event type will be used as the message Subject.
Time Issued - Check this box to include the time message was issued by the issuing authority.
Originator - Includes the name of agency or authority originating the message, example: National Weather Service
Station - Includes the originating station, example: NWR (NOAA Weather Radio), WFAA/TV, KKQV/FM, etc.
County/Area Names - Includes each county or area name in the alert. In some cases the list can be long.
Signature - Includes signature text at end of message
Signature - The text entered here will be placed at the end of every alert email sent. It should identify the sending party, contact name/number and may include a short disclaimer.
Note that using a long signature could cause the received message be truncated or split into 2 or more messages when sent to a mobile SMS address - these are usually limited by the carrier to between 140-240 characters total.
6. Test Email Settings
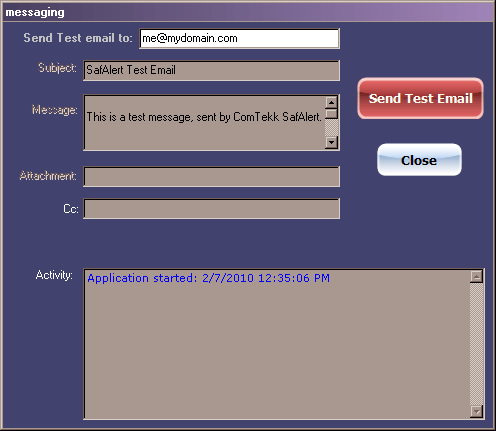
6.1 To check your Mail Server settings, click the Test Email button in the Mail tab of the Settings window, which will open the messaging window:
6.2 Enter a recipient's email address for testing (preferrably an account you have immediate access to), then click Send Test Email. Normally the sending process shouldn't take more than half a minute. You can monitor progress in the Activity window. Below is an example of a successful transmission, ending with the message "Connection closed." Any error messages displayed here will aid in troubleshooting your email settings.
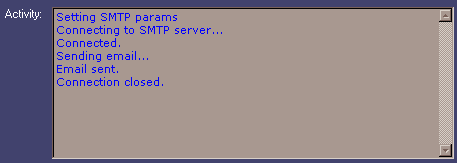
6.2.1Upon successful send, check the Inbox of recipient email address. Depending on the service and software, the test email could appear immediately, or take a few minutes or more.
NOTE: There is no way to control how quickly an email is delivered once it has been sent.
6.2.2Click the Close button when you have finished testing.
7. General Settings
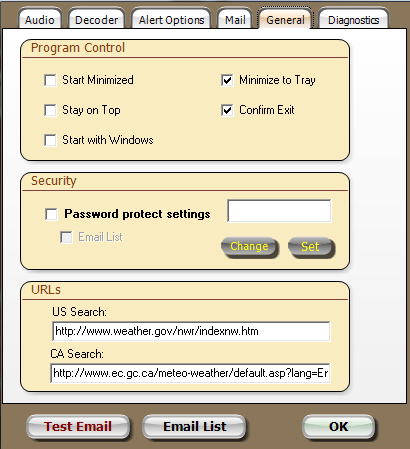
7.1 Program Control - various program behavior settings
Start Minimized - Causes EASAlert to launch in minimized state. When EASAlert is minimized, only the tray icon
will remain visible in the lower right-hand corner of the Windows Desktop.
Stay on Top - Keeps EASAlert window on top of all other windows if multiple programs are open.
Start with Windows - Loads EASAlert automatically when Microsoft Windows is started.
Minimize to Tray - When checked, EASAlert will minimize to the system tray, in the lower right-hand corner of the desktop. Right-click the tornado icon for menu options, or left-click to restore window.
Confirm Exit - If enabled, this option will cause a dialog box to open when exiting the program asking you to confirm. This can help prevent a user from stopping EASAlert accidentally.
7.2 Security - When this box is checked, a password will be required to access the Settings window.
Enter your password carefully and keep it in a safe place. Password reset requires contacting Tech Support...
Click the Change button. Enter password in the text box, then click the Set button. Password is case sensitive. The default password is "test"
To password-protect email list, check the Email List box as well.
7.3 URLs - Use to change the Web Search (Decoder tab) button URLs for USA or Canada. Default web sites are:
US Search: http://www.weather.gov/nwr/indexnw.htm
CA Search: http://www.ec.gc.ca/meteo-weather/default.asp?lang=En&n=1CD5BDF2-1
8. Diagnostics
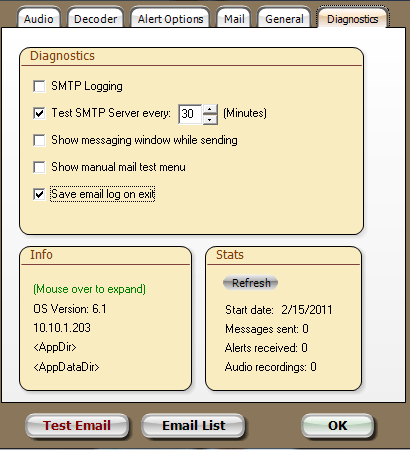
8.1 SMTP Logging - Enable this checkbox to log email activity for troubleshooting. File name is "smtp.log", found in the program folder and may be viewed with Notepad or any text viewer/editor. Note this file can become very large if left active for a long time. For this reason, the SMTP Logging defaults to "OFF" when starting EASAlert. For more info, see the Troubleshooting FAQ.
8.2 Save event log on exit - upon exiting EASAlert, the contents of the "Activity" box on the messaging window will be saved to the file "mail.log", found in the program folder and may be viewed with Notepad or any text viewer/editor.
8.3 Test SMTP Server - Used to periodically test communications with your email server. If the test fails, the Mail Server status indicator on the main screen will turn yellow. If the test is good on the next try, status will return to green.
8.4 Show messaging window while sending - provided as an additional aid for troubleshooting email problems.
8.5 Show manual test menu - Displays a menu for manually stepping through each task when sending a test email. Connect to server, send mail, disconnect. This is provided as a troubleshooting tool.
8.6 Info - Additional information is provided for convenience at the bottom left panel of the Diagnostics window.
First is the Windows OS Version. Below, is the computer's local IP address. Mouse over <AppDir> or <AppDataDir> to reveal file locations for the application and data folders. Tone-out and Email Lists are contained in the AppDataDir and program log files are stored in the AppDir. The alert log and audio recordings are saved in the folder shown on the Alert Options tab.
8.7 Stats - Program statistics information is provided at the bottom right panel of the Diagnostics window.
Start date - first program run date.
Messages sent - running total of email messages sent.
Alerts received - running total of tone alerts received.
Audio recordings - running total of audio recordings made.
9. Email List
To access the Email List: From the Settings window, click the Email List button in the lower left corner, or from the Main Menu, click View -> Email List.
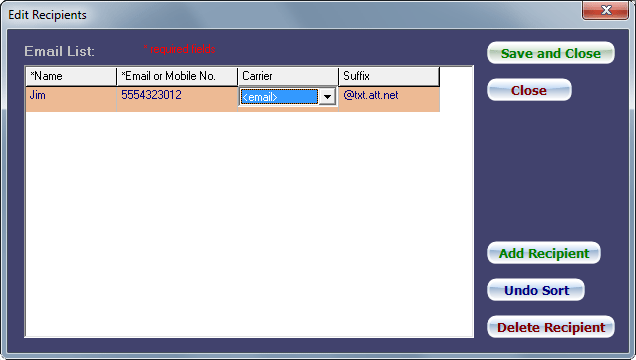
To edit an existing entry, click to select the row, then click again on the text to edit the field (the Suffix column cannot be edited). To sort the entries, click on the column heading -for example to sort entries by group, click on the Name heading. Click again to invert sort order. The Undo Sort button will return entries to their original order. To delete an entry, click on it (single-click) to highlight that entry, then click the Delete Recipient button.
9.1 To add a new entry, click the Add Recipient button. This entry will be inserted into the next available empty row, or a new row will be added at the end of the list. Use the Tab key or mouse to move cursor to next field.
Name - recipient's name, as you want it to appear in the Email List.
Email or Mobile No. - Normal email address, OR 10-digit mobile phone number (enter the numbers only as shown above, most carriers require 10 digits. No spaces, dashes, etc.).
Be sure to have all SMS recipients check their calling plan allowances before using this feature. Most wireless carriers charge extra for text/SMS messaging!
Carrier - Select <email> if using a complete email address, otherwise choose a cellular carrier if using SMS. The appropriate email suffix will be shown in the right-hand column. DO NOT select a carrier if you have entered a complete email address. This will
If your carrier is not listed in the drop-down, enter as a complete email address and select <email> in the Carrier drop-down. Most SMS gateways may be found on one of these lists:
http://www.mutube.com/projects/open-email-to-sms/gateway-list/
http://en.wikipedia.org/wiki/List_of_SMS_gateways
9.2 Save email list:
Click Save and Close once you are satisfied all entries are correct.
10. PTT Relay Settings
A serial RS-232 port, USB adaptor, or Sound Card Interface is required to utilize this feature.
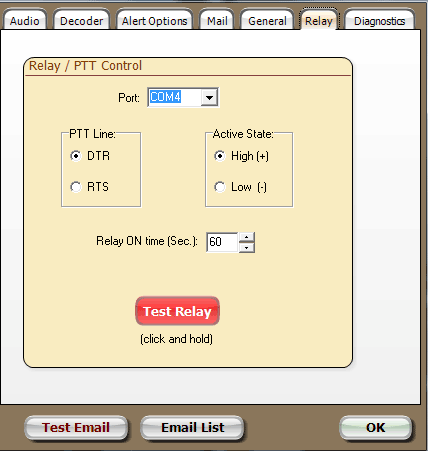
To access PTT Relay settings, click the Relay tab:
This feature may be used to activate a light, bell, door or other electrical device whenever an alert is triggered. It may also used in conjuction with the ComTekk Universal Radio Interface or most amateur Sound Card Interface devices to act as a repeater, retransmitting the audio message. This is often used to re-broadcast NOAA weather alerts over ham radio (FCC rules apply).
1. Control Port - feature is enabled when a valid serial port is selected (COM1 ~ COM64 supported). If selected port is not available, drop-down will return to the <OFF> position.
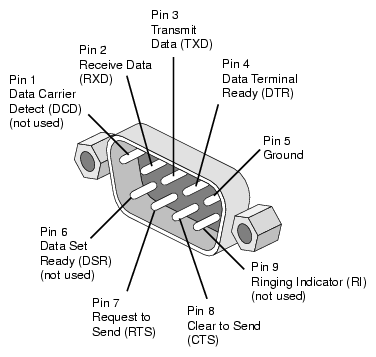
2. Control Pin - Select DTR (pin-4) or RTS (pin-7) control pin.
Standard DB-9 serial connections as seen on the back of a computer or USB adapter
NOTE: Always use an isolated external circuit to protect computer from possible damage.
3. Active State - determines whether the pin's voltage when activated by the decoder. Select High for positive voltage (+) or Low for negative (-).
4. Hold Time - the time in seconds that the serial pin will remain active. If set to 10 seconds and relay is connected to a bell, the bell will ring for 10 seconds every time tones are successfully decoded.
5. Test button - Click and hold to cause selected serial port/pin to be activated. Release mouse button to deactivate.
Congratulations! You should now be ready to start using EASAlert. To test, enable RWT (weekly test) event type. Test messages are usually send weekly each Wed. by NOAA Weather Radio.
Next section: Using EASAlert
Disclaimer:
The author makes no warranties or guarantees of performance or suitability for any particular purpose, and assumes no liability whatsoever for the use or mis-use of any software products. This product is not intended for use as a primary means of notification.

