
Using ComTekk 2-Tone Decoder
1. Running ComTekk 2-Tone Decoder
First-time users must enter their user registration information to enable the software. This will be sent via email after purchase is made.
Once ComTekk 2-Tone has been successfully installed, you may simply double-click the CT2Tone desktop icon or Click the Windows Start menu, then Programs, choose the ComTekk folder, then CTSinad.
To control CT2Tone:
- To run the program, click the desktop icon or go to Start->Programs->ComTekk->CT2Tone .
- The top dot-matrix display indicates the current program status. A green "Ready" shows the decoder is running and listening for tones.
- Click the "POWER" button or "X" button in the upper-right corner of the window to close the application completely.
Please note that if you have more than one audio device installed, CT2Tone will only use the system's default sound device.
Continue on to Section 2 below for detailed description of the buttons and screens.
2. The CT2Tone GUI (Controls and Indicators)
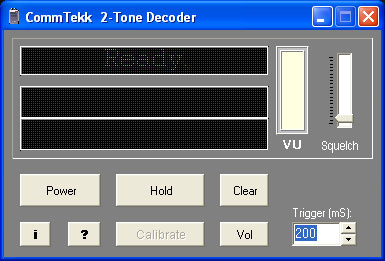
Controls:
1. POWER - Close / Exit the program
2. Hold - Stops the decoder and freezes the current display(s), allowing time to write down frequencies before another tone-out is decoded.
3. Clear - Clears the display(s)
3. Squelch - sets the relative signal level detection threshold, so background noise or weak signals can be disregarded. The default setting should work for most applications.
5. Vol - Opens the Windows Mixer control panel for sound device input/output settings.
6. Trigger up/down - Sets the minimum tone duration to be decoded. Enables filtering of unwanted short duration tones, such as ANI or DTMF signaling.
7. Calibrate - It is highly recommended that the software be calibrated to your sound card on first use. This step need only be performed once, unless you change to a different sound card. This will ensure the highest decoder accuracy.
8. ![]() - Help button, opens the user manual
- Help button, opens the user manual
9. ![]() - Opens the "About" screen (and Registration)
- Opens the "About" screen (and Registration)
Indicators:
1. VU Meter - Analog meter display gives an easy-to-read indication of relative audio input signal. This is handy for setting receiver and software volume controls.
2. Status Display - The top-most dot-matrix display gives the current program status, such as "Ready", "Calibrating", "Decoding".
3. Data Displays - The two lower dot-matrix displays give the actual tone frequencies decoded and calibration details. Control these with the "Hold" and "Clear" buttons.
3. Windows Mixer Control Panel
Windows Volume Control (Playback):
This screen controls the sound card OUTPUTS and will generally have no effect on the decoder, since it uses the sound card INPUTS, which are controlled by the Recording Control (see next section below).
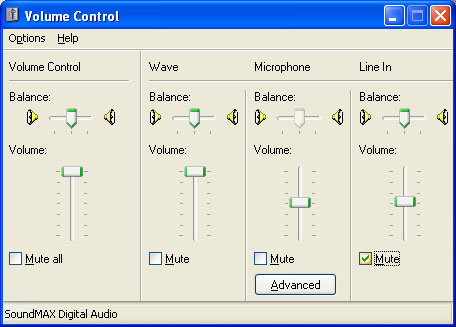
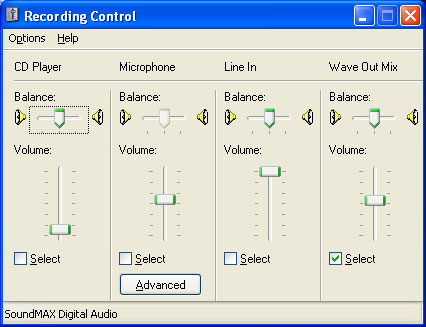
The Windows Recording Control [below] affects sound device INPUTS, such as LINE , AUX, Wave, or Microphone. To access Recording controls, open Windows Volume Control from ComTekk, or with a double-click on the speaker icon in your system tray. Select "Options" from the menu, then "Properties." Click the "Recording" radio button. Be sure the appropriate input item is checked. Settings will be saved on closing this window.
It is very important to have the correct input device enabled, otherwise the decoder may not function.
4. Calibration
Computer sound cards vary greatly in quality and design. They have their own time-base which controls the A/D and D/A sampling rate, which in turn directly affects the frequency. The calibration routine allows for compensation for timebase error, thus allowing accurate frequency synthesis.
ComTekk 2-Tone includes auto-calibration, which does not require any specialized equipment. However, a FULL-DUPLEX sound card is required. This means the card has the ability to play and record simultaneously. Nearly all newer sound cards are full duplex.
NOTE: Calibration need only be performed once for a particular sound card.
CALIBRATION INSTRUCTIONS:
1. Loop the sound card OUTPUT back to its INPUT. Three different ways to do this are presented below:
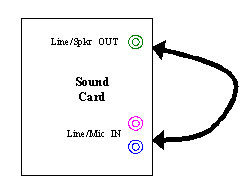
Option1: [above] Use a 1/8" stereo cable to connect
Line/Speaker OUT to
Line/Aux/Mic IN.
Option 2: Click the "Vol" button to open the Windows Recording Control. Select the "Wave Out Mix" (or similar) checkbox to create an internal loopback. Not all sound card drivers have this option. If available, it negates the need for an external connection.
Option 3: Audio pickup - If you have a microphone connected to (or internal to) your computer, Click the "Vol" button to open the Windows Recording Control. Select the "Microphone" checkbox to enable the MIC input. Place the microphone directly in front of a computer speaker so it will pick up the sound from the tone generator. Take care not to get it too close which will generate feedback, voiding the calibration.
2. Once the loopback is established using one of the methods described above, Click the "Calibrate" button to begin.
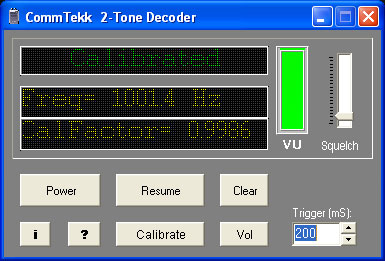
If using speakers and loopback is working, you should hear a very short tone. The Status will change to "Calibrated" and the frequency and calibration factor will be displayed. The VU meter will indicate relative INPUT level. It may be necessary to adjust input or output levels, or the microphone position if using Option 3 for loopback.
The measured frequency should be somewhere close to 1,000 Hz. If it is closer to 2,000 Hz, the volume is most likely too high. To run the calibration again, you will have to close the program and delete the INI file [see Notes below].
If the calibration tone was not detected, this will be indicated on the "Status" line. Make adjustments and click "Calibrate" to try again. It may be necessary to attempt a different loopback method if you can't get it to work after several tries.
Note: Calibration settings are saved to INI file upon exiting the program. The "Calibrate" button will be disabled once a successful calibration has been run. To re-calibrate, delete the "CT2Tone.INI" file, then run CT2Tone again. The INI file is located in the application folder Program Files->ComTekk->CT2Tone by default.
4. Log File
To enable the text log feature, click the "Log File" checkbox. The Open File dialog will pop up - select a new file name and folder, OR select an existing file to append a previous log. You will be prompted to append or replace this file.
The log file is a text file, saved in .CSV (Comma Separated Value) format, which can easily be viewed and edited with Microsoft Excel. Each decoded tone or pair is saved with a date,time, and tone frequencies in Hertz (Hz). If only a second tone is not detected within 5 seconds, then the "Tone2" field will be blank for that entry.
To stop/disable logging, just click to un-check the "Log File" checkbox. For convenience, the last folder used is saved upon closing the program.