TRC
Tone Remote Console
User Manual
User Settings & Preferences
CONTENTS:
NOTE: Settings are stored in the "config.ini" file found in the following location:
Windows 7/Vista - C:\ProgramData\ComTekk\Tone Remote Console\
Windows XP - C:\Documents and Settings\All Users\Application Data\ComTekk\Tone Remote Console\
1. Sound Card Calibration
Computer sound cards vary greatly in quality and design. They have their own time-base which controls the A/D and D/A sampling rate, which in turn directly affects the frequency. The calibration routine allows for compensation for time base error, thus allowing accurate frequency synthesis.
Recommended Equipment:
- Calibrated Frequency Counter with resolution to 1Hz
- Shielded cable with appropriate connectors
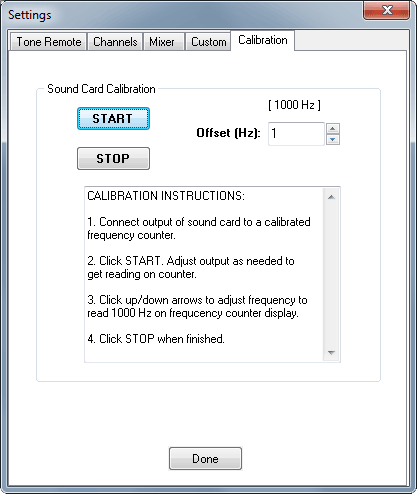
CALIBRATION INSTRUCTIONS:
1. Connect output of sound card to a calibrated frequency counter.
2. From ComTekk, open the Settings window, using the toolbar or or select Settings from the File menu. Click START. Using the Mixer panel and Windows volume control (Press Ctrl+V or on the Tools menu, select WinVolume), adjust output as needed to get a steady reading on counter, typically at least 1Vp-p. Set counter to read down to 1Hz.

3. Click up/down arrows to adjust frequency to read 1000 Hz on frequency counter display. Adjustment range is limited to +/- 100Hz. If this is not adequate, the sound card in use is likely not reliable and a different computer should be used.
4. Click STOP when finished. The difference if any has been saved and will be used to adjust all the signal generators within ComTekk.
Note: All settings are saved upon exiting the program.
2. Tone Remote Settings
These adjustments are provided for customization and convenience, allowing for the most precise signal emulation. Under normal circumstances, you should not need to change these settings.
Recommended Equipment:
- Transmission Impairment (TIMS) Test Set, such as the Ameritec AM44
- Digital Storage Oscilloscope (DSO)
- Shielded cables with appropriate connectors/adaptors
Connect computer sound device output to 600-ohm line or circuit to be tested and to scope or TIMS.
*WARNING* Do Not connect sound device directly to a POTS line or other circuit which could have voltage present. This could damage the computer as it does not provide any protection against high voltage or transient surges. Use with ComTekk Line Interface Adaptor.
Adjustment Procedures:
NOTE: These settings should only be altered by a qualified service technician.
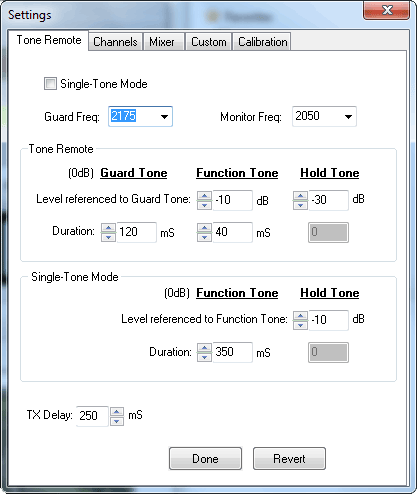
1. Open the Settings window (Tools->Settings or Ctrl-S). In the Settings window, click on the Tone Remote tab.

2. Select the desired Guard and Monitor tone frequencies. Select Single Tone Mode if desired. Note that if Single-Tone Mode is selected, only those fields below will be accessible, and vic-versa for Dual-Tone Mode.
3. To set Hold Tone level, click the PTT button to begin transmitting. Note the signal level on test equipment. Adjust the Windows Volume and Mixer controls as needed to achieve desired signal output**.
Using the up/down buttons for each field, adjust dBm level as required for single or dual-tone mode in the Settings screen. NOTE: To see the change, you must stop transmission, then start again. To restore the original stored values, click the Revert button; To save the new values, click OK.
4. For Guard Tone or Function Tone adjustments, use a DSO in storage mode to capture the initial 2-tone transmission. Use Channel or MONitor console buttons to transmit.
5. Adjust dual or single-tone durations, then adjust levels if needed.
6. The "TX Delay" time determines how long TRC will delay before transmitting secondary signals, such as tone-burst or alert tones. At a minimum, this setting should typically be slightly longer than the total of the Guard Tone Duration plus Function Tone Duration. About the only exception to this rule would be when transmitting over a link to control a remote base station.
**Remember that the Windows Volume (WinVolume, Ctrl+V) will control the maximum output of the sound device. The ComTekk Mixer level control sets the Tone Remote level, relative to Windows Volume. These level settings are relative to the maximum generator output.
Note: All settings are saved upon exiting the program.
3. Channel Settings
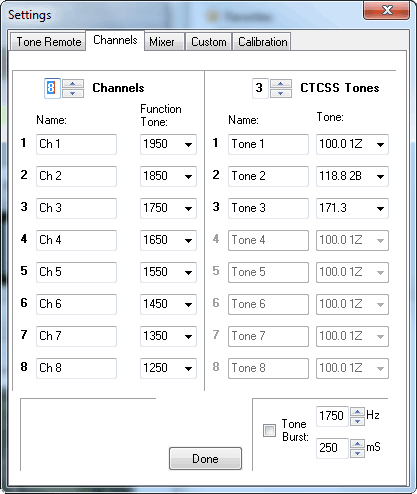
1. Open the Settings window (Tools->Settings or Ctrl-S) and click on the Channels tab.

2. First, select the desired number of channels (1-8), and the number of CTCSS tones (0-8). Note the corresponding number of channel settings fields below will be enabled, with the rest "grayed-out."
3. Now type in the display name for each channel (left-hand column) as you want it to appear on the console. Select the corresponding function tone frequency from the drop-down box to the right of the names.
4. Repeat this procedure for the CTCSS Tone channels in the right-hand column, selecting the desired tone frequency for each.
5. If a tone-burst signal is required for repeater access, click the "Tone Burst:" checkbox to enable. Then select the desired frequency and duration using the up/down buttons. It may be necessary to adjust the TX Delay time in the Tone Remote settings window.
Note: All settings are saved upon exiting the program.
4. Custom Settings
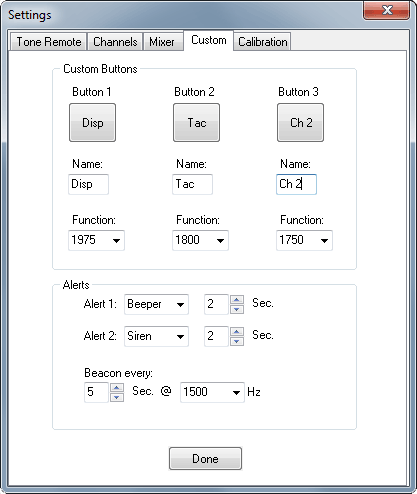
1. Open the Settings window (Tools->Settings or Ctrl-S), then click on the Custom tab.

2. The three user-programmable function keys may be set here. Enter the the button label in the "Name" box below each button. A preview of the button can be seen above. Then select the desired function tone frequency in the drop-down box below each button.
3. The two Alert console keys are also set in this screen. Select the alert type using the drop-down boxes and the duration in seconds for each alert button.
4. Finally, the beacon delay and attention-signal frequency are selected at the bottom of the page. Click "Done" when finished.
Note: All settings are saved upon exiting the program.
5. Mixer Settings
